
Kewpie Baby


Pattern Overview
About the Pattern
This pattern is based off of a lil kewpie baby! You can make a bag or wallhanging or anything with this graph :-) The bag above was made using a 3.5mm hook and a light worsted weight yarn.
Below you’ll find two options for a pattern. The graph and one that is written out - I recommend utilizing both.
The pattern is for personal use only. If you create something with this pattern, please tag me in it! I would LOVE to see it <3
Details
Skill Level: Advanced Beginner
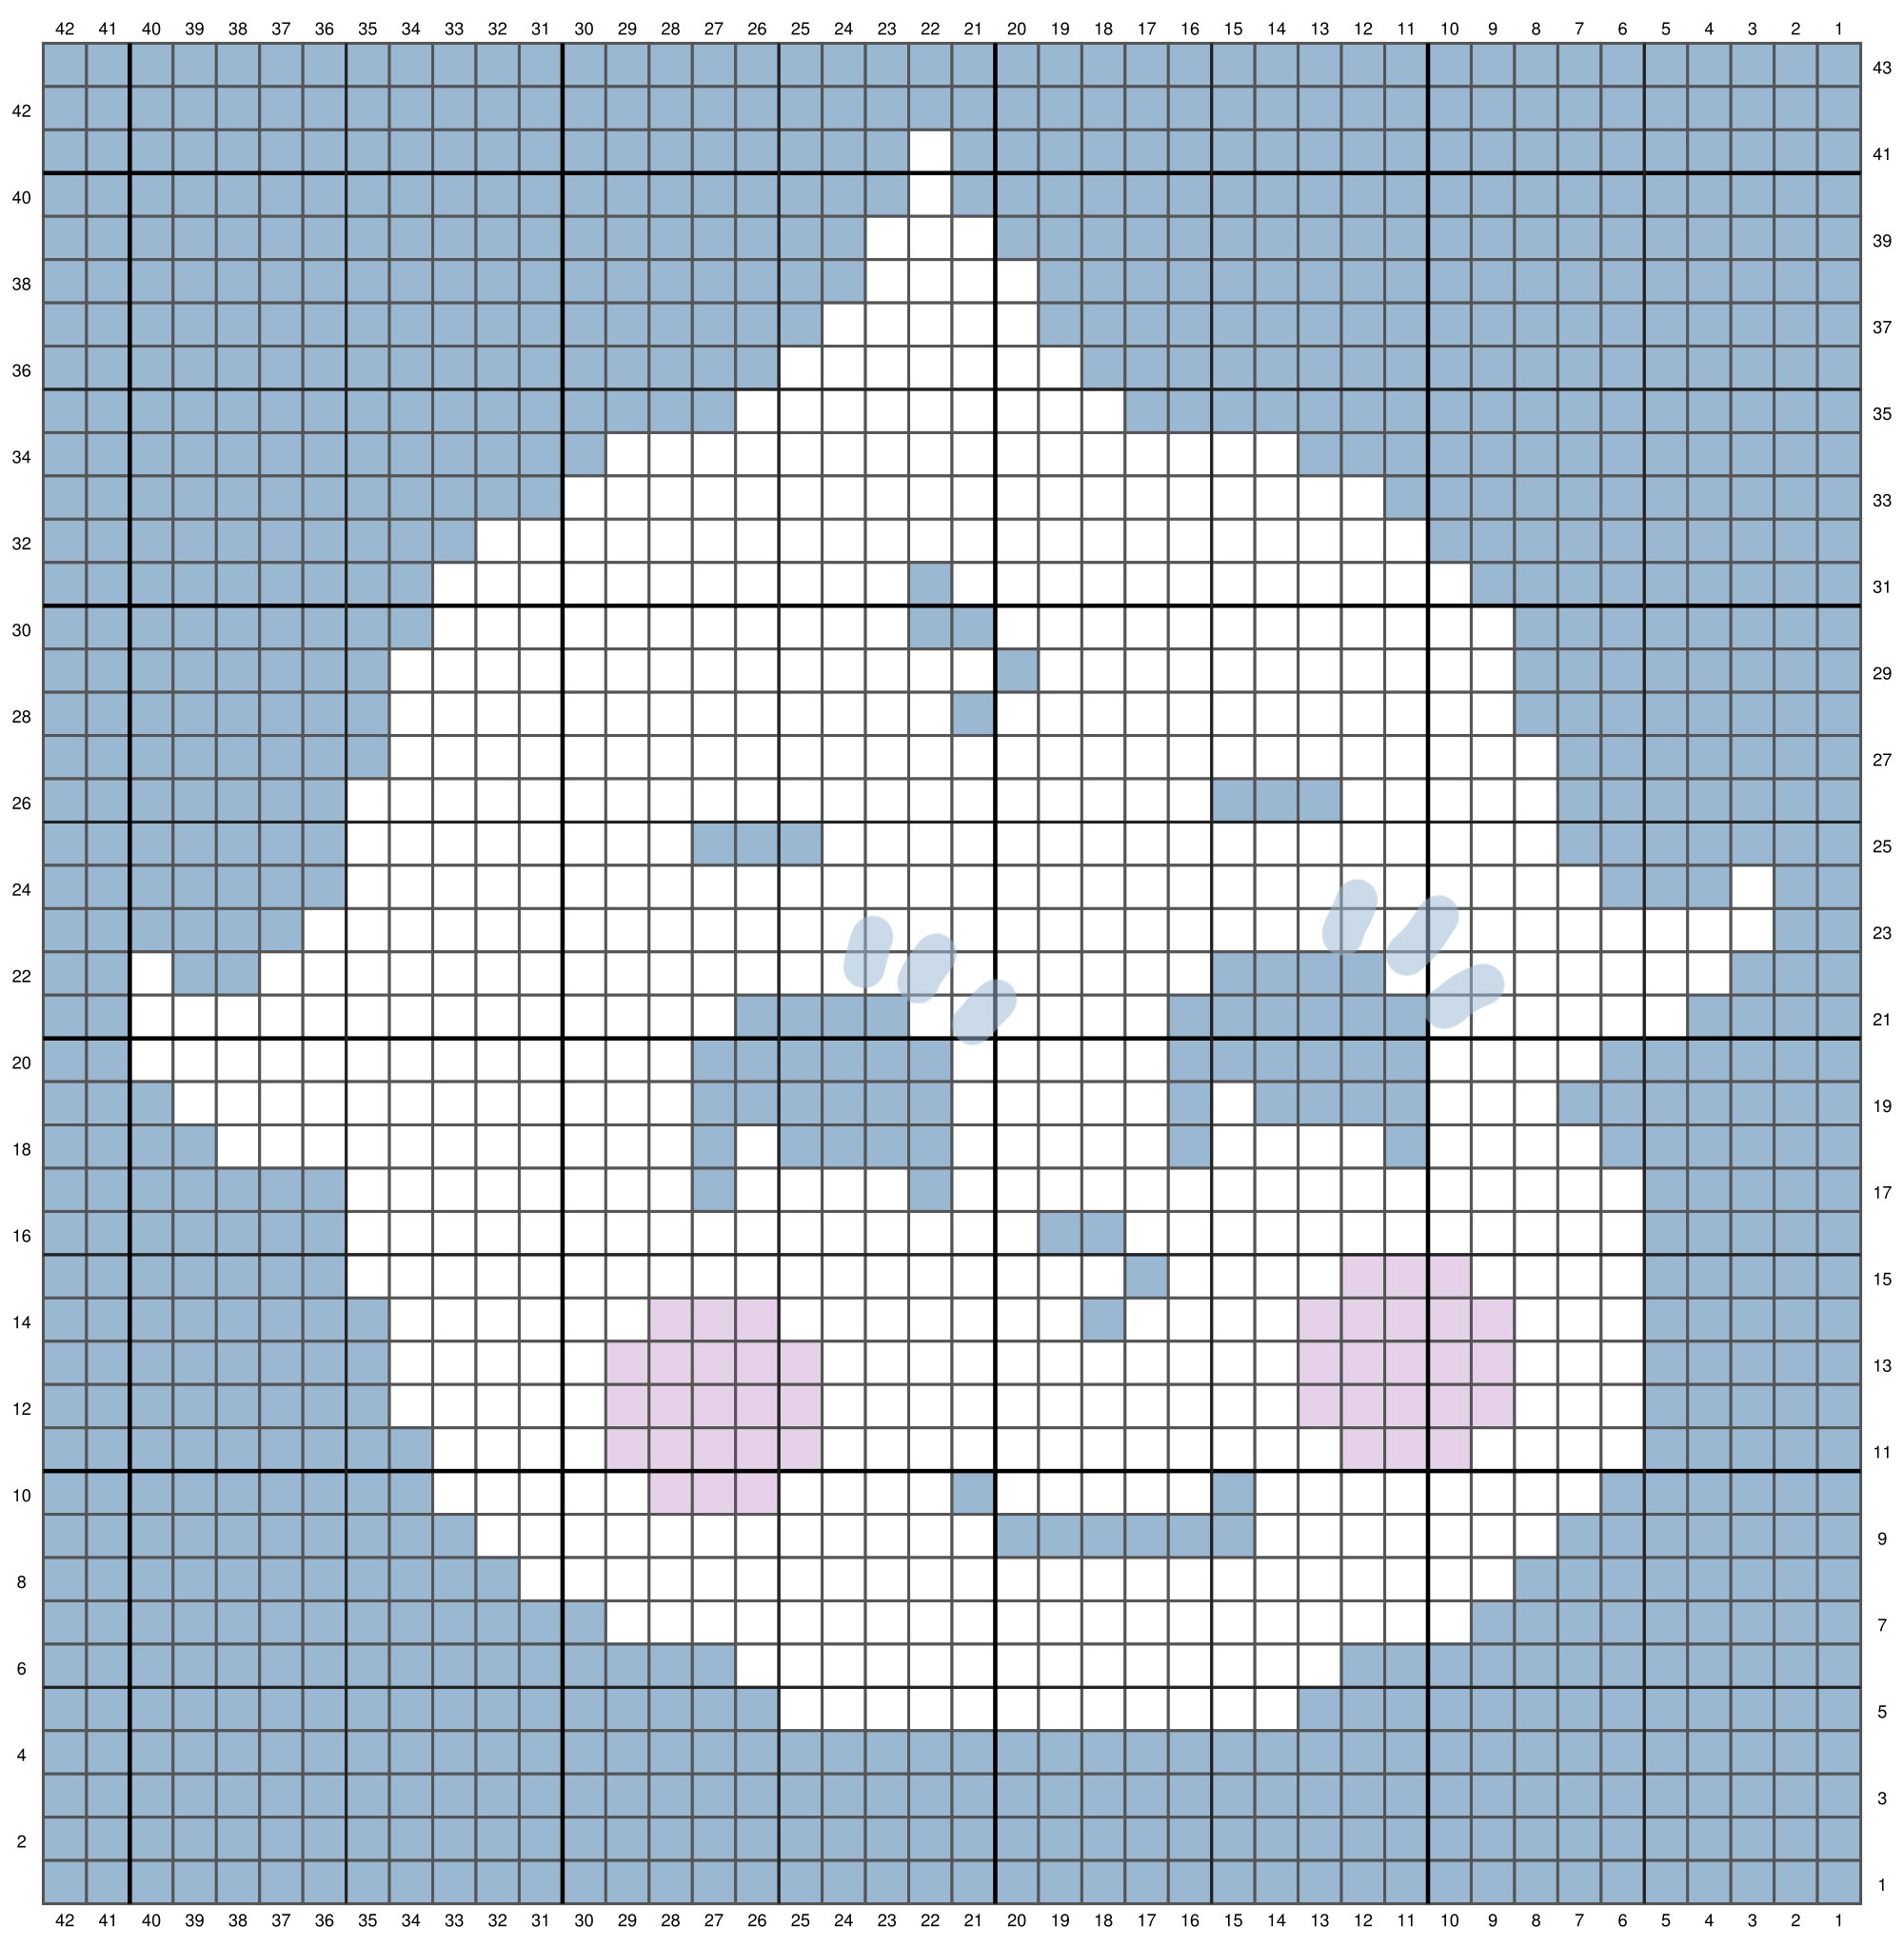
Right-Handed Graph Pattern
Chain 42 + 1 to turn to start! This pattern should be worked up using single crochet stitches. On the graph you’ll see that the eyelashes are not actual stitches. This is because I used surface crochet to add them. Here’s a tutorial I found on how to surface crochet if you’re unfamiliar.
Super super important for this pattern is that you are comfortable reading a graph and referencing the right side and wrong side. This pattern will come out completely different if you don’t. You’ll notice you’re off track if you have some disconnected stitches in the mouth, nose, and hair.
Left-Handed Graph Pattern
Chain 42 + 1 to turn to start! This pattern should be worked up using single crochet stitches. On the graph you’ll see that the eyelashes are not actual stitches. This is because I used surface crochet to add them. Here’s a tutorial I found on how to surface crochet if you’re unfamiliar. Reference the right-handed graph above to see where to place them.
Super super important for this pattern is that you are comfortable reading a graph and referencing the right side and wrong side. This pattern will come out completely different if you don’t. You’ll notice you’re off track if you have some disconnected stitches in the mouth, nose, and hair.
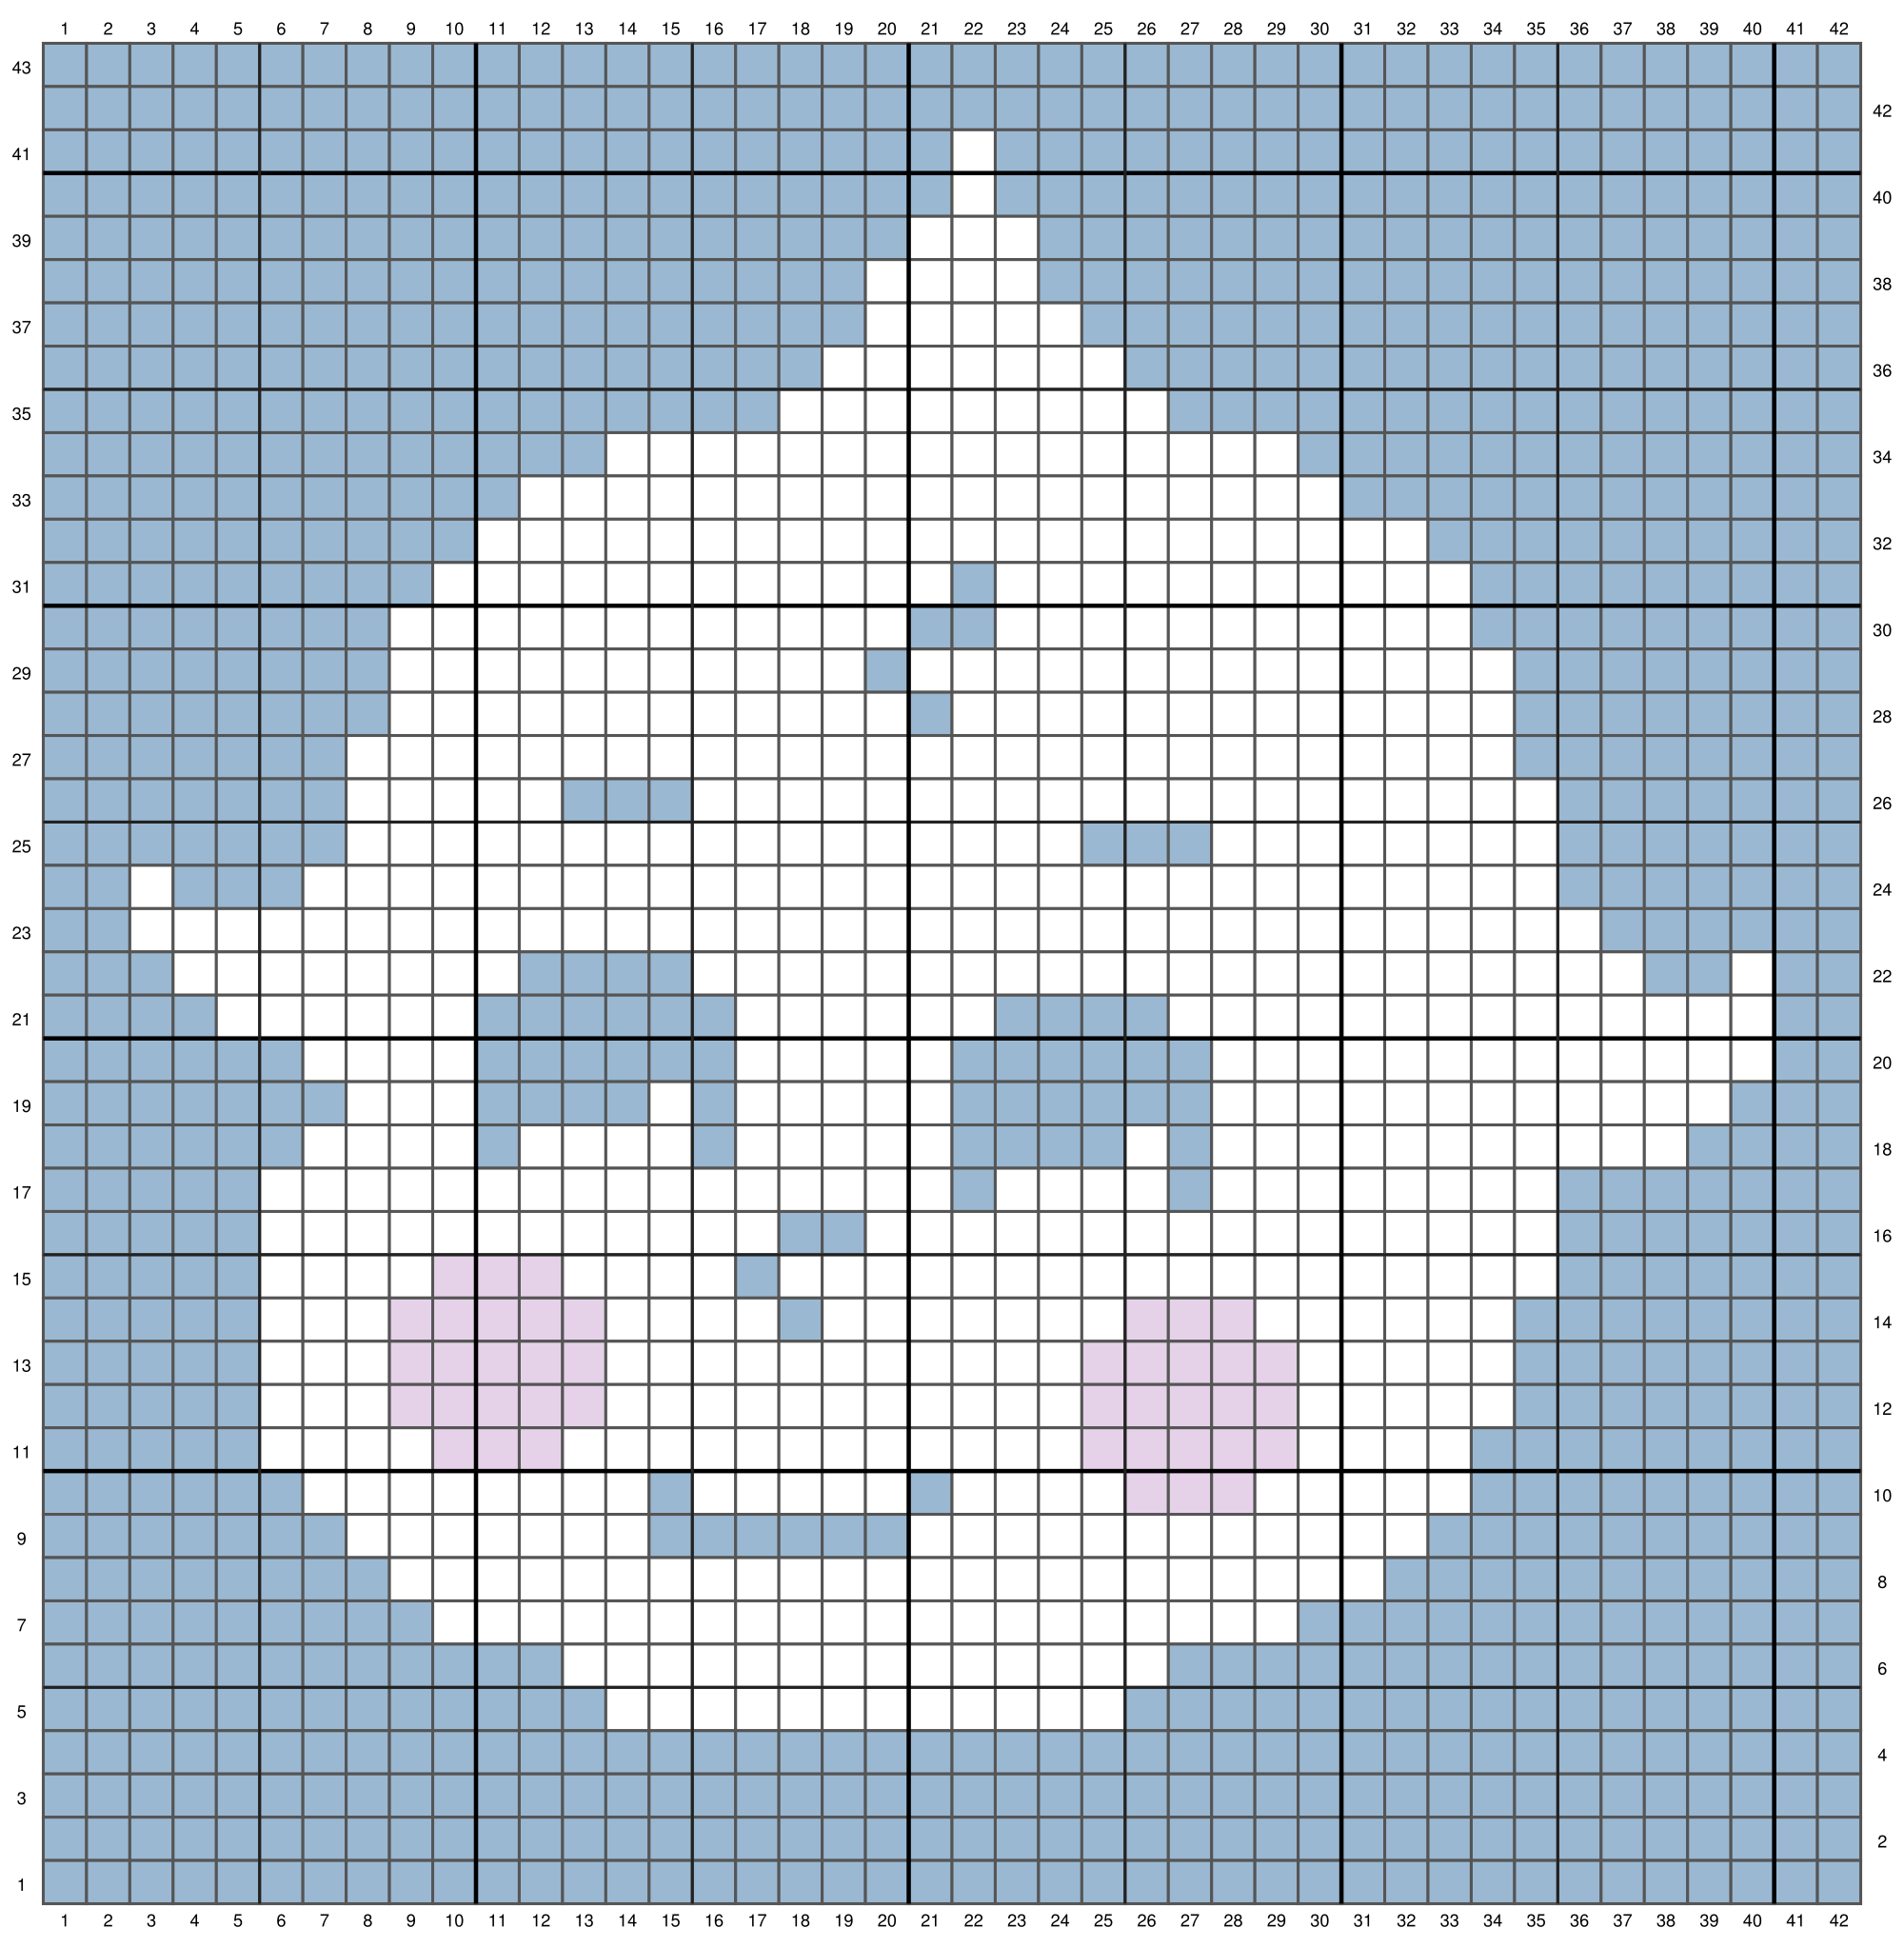
THIS GRAPH IS A VISUAL REPRESENTATION OF THE BACK. You are starting on a wrong side row meaning you carry the yarn towards you on odd # rows. Find a more in depth explanation on how to read a left-handed graph here.
Written Pattern
Please reference the key to the right to read this pattern. WS and RS refer to which side you should be on. If utilizing the graph above, the RS will be the odd numbers, while the even numbers will refer to the WS. This is worked up in single crochet and you must remember to chain one at the end of each row to turn.
The foundation chain does NOT count as a row.
First, chain 42 + 1 to turn
Row 1 [RS]: b42
Row 2 [WS]: b42
Row 3 [RS]: b42
Row 4 [WS]: b42
Row 5 [RS]: b13, w12, b17
Row 6 [WS]: b16, w14, b12
Row 7 [RS]: b9, w20, b13
Row 8 [WS]: b11, w23, b8
Row 9 [RS]: b7, w7, b6, w12, b10
Row 10 [WS]: b9, w5, p3, w4, b1, w5, b1, w8, b6
Row 11 [RS]: b5, w4, p3, w12, p5, w4, b9
Row 12 [WS]: b8, w5, p5, w11, p5, w3, b5
Row 13 [RS]: b5, w3, p5, w11, p5, w5, b8
Row 14 [WS]: b8, w6, p3, w7, b1, w4, p5, w3, b5
Row 15 [RS]: b5, w4, p3, w4, b1, w18, b7
Row 16 [WS]: b7, w16, b2, w12, b5
Row 17 [RS]: b5, w16, b1, w4, b1, w8, b7
Row 18 [WS]: b4, w11, b1, w1, b4, w5, b1, w4, b1, w4, b6
Row 19 [RS]: b7, w3, b4, w1, b1, w5, b6, w12, b3
Row 20 [WS]: b2, w13, b6, w5, b6, w4, b6
Row 21 [RS]: b4, w6, b6, w6, b4, w14, b2
Row 22 [WS]: b2, w1, b2, w22, b4, w8, b3
Row 23 [RS]: b2, w34, b6
Row 24 [WS]: b7, w29, b3, w1, b2
Row 25 [RS]: b7, w17, b3, w8, b7
Row 26 [WS]: b7, w20, b3, w5, b7
Row 27 [RS]: b7, w27, b8
Row 28 [WS]: b8, w13, b1, w12, b8
Row 29 [RS]: b8, w11, b1, w14, b8
Row 30 [WS]: b9, w11, b2, w12, b8
Row 31 [RS]: b9, w12, b1, w11, b9
Row 32 [WS]: b10, w22, b10
Row 33 [RS]: b11, w19, b12
Row 34 [WS]: b13, w16, b13
Row 35 [RS]: b17, w9, b16
Row 36 [WS]: b17, w7, b18
Row 37 [RS]: b19, w5, b18
Row 38 [WS]: b19, w4, b19
Row 39 [RS]: b20, w3, b19
Row 40 [WS]: b20, w1, b21
Row 41 [RS]: b21, w1, b20
Row 42 [WS]: b42
Row 43 [RS]: b42
Adding the eyes
Refer to the graph above to surface crochet the eyelashes on. If you’re unfamiliar with surface crochet, reference this tutorial.
Please reference the key to the right to read this pattern. WS and RS refer to which side you should be on. If utilizing the graph above, the RS will be the odd numbers, while the even numbers will refer to the WS. This is worked up in single crochet and you must remember to chain one at the end of each row to turn.
The foundation chain does NOT count as a row.
First, chain 42 + 1 to turn
kewpie-lh
Row 1 [WS]: b42
Row 2 [RS]: b42
Row 3 [WS]: b42
Row 4 [RS]: b42
Row 5 [WS]: b13, w12, b17
Row 6 [RS]: b16, w14, b12
Row 7 [WS]: b9, w20, b13
Row 8 [RS]: b11, w23, b8
Row 9 [WS]: b7, w7, b6, w12, b10
Row 10 [RS]: b9, w5, p3, w4, b1, w5, b1, w8, b6
Row 11 [WS]: b5, w4, p3, w12, p5, w4, b9
Row 12 [RS]: b8, w5, p5, w11, p5, w3, b5
Row 13 [WS]: b5, w3, p5, w11, p5, w5, b8
Row 14 [RS]: b8, w6, p3, w7, b1, w4, p5, w3, b5
Row 15 [WS]: b5, w4, p3, w4, b1, w18, b7
Row 16 [RS]: b7, w16, b2, w12, b5
Row 17 [WS]: b5, w16, b1, w4, b1, w8, b7
Row 18 [RS]: b4, w11, b1, w1, b4, w5, b1, w4, b1, w4, b6
Row 19 [WS]: b7, w3, b4, w1, b1, w5, b6, w12, b3
Row 20 [RS]: b2, w13, b6, w5, b6, w4, b6
Row 21 [WS]: b4, w6, b6, w6, b4, w14, b2
Row 22 [RS]: b2, w1, b2, w22, b4, w8, b3
Row 23 [WS]: b2, w34, b6
Row 24 [RS]: b7, w29, b3, w1, b2
Row 25 [WS]: b7, w17, b3, w8, b7
Row 26 [RS]: b7, w20, b3, w5, b7
Row 27 [WS]: b7, w27, b8
Row 28 [RS]: b8, w13, b1, w12, b8
Row 29 [WS]: b8, w11, b1, w14, b8
Row 30 [RS]: b9, w11, b2, w12, b8
Row 31 [WS]: b9, w12, b1, w11, b9
Row 32 [RS]: b10, w22, b10
Row 33 [WS]: b11, w19, b12
Row 34 [RS]: b13, w16, b13
Row 35 [WS]: b17, w9, b16
Row 36 [RS]: b17, w7, b18
Row 37 [WS]: b19, w5, b18
Row 38 [RS]: b19, w4, b19
Row 39 [WS]: b20, w3, b19
Row 40 [RS]: b20, w1, b21
Row 41 [WS]: b21, w1, b20
Row 42 [RS]: b42
Row 43 [WS]: b42
Adding the eyes
Refer to the graph above to surface crochet the eyelashes on. If you’re unfamiliar with surface crochet, reference this tutorial.
Key:
B = Blue
W = White
P = Purple
WS = Wrong Side (The back side of your work)
RS = Right Side (The front side of your work